Compiling / installing pycurl on Solaris

I had to add pycurl to our Solaris 10 image. I hear (in the ether?) that packaging is a bit weird in Python, (pip / easy_install , whatever). Running easy_install pycurl returned

Searching for pycurl
Reading http://pypi.python.org/simple/pycurl/
Best match: pycurl 7.19.5.1
Downloading https://pypi.python.org/packages/source/p/pycurl/pycurl-7.19.5.1.tar .gz#md5=f44cd54256d7a643ab7b16e3f409b26b
Processing pycurl-7.19.5.1.tar.gz
Running pycurl-7.19.5.1/setup.py -q bdist_egg --dist-dir /tmp/easy_install-PtCVY 7/pycurl-7.19.5.1/egg-dist-tmp-fN961C
Using curl-config (libcurl 7.23.1)
In file included from src/docstrings.c:4:
src/pycurl.h:145:31: openssl/crypto.h: No such file or directory
error: Setup script exited with error: command 'gcc' failed with exit status 1

So I needed to tell it that OpenSSL lives in /usr/local/ssl on my system, but couldn’t find out how to pass build-ext options to easy_install. It seemed to completely ignore the setup.cfg file I had written for it. So I bailed on easy_install and got the tarball.

Curl-config seems clever – it will just return the right values in case you want to build against it, so I didn’t need to pass it anything about which SSL libraries to use – it just knows and passes it on.

All normal stuff, right. This is the blog worthy part:


python setup.py build_ext --curl-config=/usr/local/bin/curl-config
Using /usr/local/bin/curl-config (libcurl 7.23.1)
running build_ext
building 'pycurl' extension
gcc -shared build/temp.solaris-2.10-i86pc-2.6/src/docstrings.o build/temp.solaris-2.10-i86pc-2.6/src/easy.o build/temp.solaris-2.10-i86pc-2.6/src/module.o build/temp.solaris-2.10-i86pc-2.6/src/multi.o build/temp.solaris-2.10-i86pc-2.6/src/oscompat.o build/temp.solaris-2.10-i86pc-2.6/src/pythoncompat.o build/temp.solaris-2.10-i86pc-2.6/src/share.o build/temp.solaris-2.10-i86pc-2.6/src/stringcompat.o build/temp.solaris-2.10-i86pc-2.6/src/threadsupport.o -L/usr/local/lib -L/usr/local/lib -L/usr/lib -L/usr/openwin/lib -L/usr/local/ssl/lib -L/usr/X11R6/lib -L/usr/local/BerkeleyDB.4.7/lib -L/usr/local/mysql/lib -L/usr/local/ssl/lib -L/usr/local/lib -L/usr/openwin/lib -L/usr/local/ssl/lib -L/usr/X11R6/lib -L/usr/local/BerkeleyDB.4.7/lib -L/usr/local/mysql/lib -lcurl -lidn -lssh2 -lssl -lcrypto -lrt -lsocket -lnsl -lssl -lcrypto -lsocket -lnsl -ldl -lz -lssh2 -lsocket -lnsl -lcrypto -o build/lib.solaris-2.10-i86pc-2.6/pycurl.so -R/usr/local/lib -R/usr/lib -R/usr/openwin/lib -R/usr/local/ssl/lib -R/usr/X11R6/lib -R/usr/local/BerkeleyDB.4.7/lib -R/usr/local/mysql/lib
collect2: ld terminated with signal 8 [Arithmetic Exception], core dumped
error: command 'gcc' failed with exit status 1

So how do I change the linker that gcc is using? Apparently you can’t.

This post really helped clarify it, particularly the command below:

Running: gcc -print-prog-name=ld returns:
/usr/ccs/bin/ld
And the ccs directory contains the Solaris versions of the standard Unix build tools!

So there is a mismatch between the Gnu Compiler and the Solaris linker (maybe?) .

Rerunning with a different $PATH order does nothing here, so don’t bother. This is way nastier. ;o)


mv /usr/ccs/bin/ld /usr/ccs/bin/ld-old
ln -s /usr/sfw/bin/gld /usr/ccs/bin/ld

Note the 'g' in the ld executable, which I assume is for 'Gnu'.

After that it built fine.

Posted in solution, tip | 1 Comment

Automating Oracle 11.2 installation on RHEL 7

I’ve seen a few guides out there about how to install Oracle 11.2 on RHEL 7, but none that will run silently, end to end, with no clicking.

Currently, if Oracle is required, we download a script in the kickstart and add it to /etc/rc.d/rc.local , so it executes when the machine comes up. This works fine on RHEL5 and RHEL6, but hits a few issues on RHEL7. I’ll just go through the things I had to change to make this work on RHEL7.

1. Change cvu_config file, to assume redhat 6 at least. Funnily enough, you don’t have to do this on redhat 6! :

sed -i -e 's/^CV_ASSUME_DISTID=.*/CV_ASSUME_DISTID=OEL6/g' /database/stage/cvu/cv/admin/cvu_config

2. Ok, this one is a bit ugly! Many sites describe how you have to edit a linker file to make it work (like here , or here).

The fix is adding “-lnnz11” to the end of the ins_emagent.mk file *AFTER* the linking step of the install has failed.

To make it work without rerunning the install, we have to edit the linker file inside the product files before it installs:

i) Install a JVM to get the jar utility (yum -y install java-1.7.0-openjdk-devel)
ii) Unzip the file containing the ins_emagent.mk file

cd /database/stage/Components
unzip ./oracle.sysman.agent/10.2.0.4.5/1/DataFiles/filegroup38.jar sysman/lib/ins_emagent.mk

iii) Add the -lnnz11 flag

sed -i -e 's/\$(MK_EMAGENT_NMECTL)/\$(MK_EMAGENT_NMECTL) -lnnz11/g' sysman/lib/ins_emagent.mk

iv) Jar the file back up again

jar -uvf ./oracle.sysman.agent/10.2.0.4.5/1/DataFiles/filegroup38.jar sysman/lib/ins_emagent.mk

Now the linker won’t fail during the install.

3. RHEL 7 has a nifty /etc/sysctl.d/ facility, where you could isolate different kernel parameters for different applications, keeping everything nice and clean. Well, with Oracle 11.2, forget about using it. Not only does having the correct kernel parameters set at runtime, but they also have to be inside the actual /etc/sysctl.conf file. So the way to do this is to append the standard group of oracle kernel params to /etc/sysctl.conf , which you can get here.

4. Now for the trickiest one that caught me out the most. Here’s the error:

INFO: Run Level: This is a prerequisite condition to test whether the system is running with proper run level.
INFO: Severity:CRITICAL
INFO: OverallStatus:OPERATION_FAILED
INFO: -----------------End of failed Tasks List----------------
INFO: Adding ExitStatus PREREQUISITES_NOT_MET to the exit status set
SEVERE: [FATAL] [INS-13013] Target environment do not meet some mandatory requirements.
CAUSE: Some of the mandatory prerequisites are not met. See logs for details. /tmp/OraInstall2014-10-16_10-52-41AM/installActions2014-10-16_10-52-41AM.log
ACTION: Identify the list of failed prerequisite checks from the log: /tmp/OraInstall2014-10-16_10-52-41AM/installActions2014-10-16_10-52-41AM.log. Then either from the log file or from installation manual find the appropriate configuration to meet the prerequisites and fix it manually.
INFO: Advice is ABORT

So I get that with the move to systemd, RHEL7 removes the concept of runlevels, but the runlevel command remains for backwards compatibility. It looks like the runlevel set when you’re running something from /etc/rc.d/rc.local (itself also a deprecated concept with systemd) is undefined. I know this because when I run the runlevel command after restarting the machine from a script called by rc.local, I get back ‘unknown’. Running runlevel again from a shell returns the more familiar ‘N 3’

So setting the runlevel by hand before running the oracle installer didn’t seem to work, although if called, the runlevel command returned ‘N 3’ anyway.

su - oracle -c "export RUNLEVEL=3 ; ./runInstaller -executePrereqs -silent -waitforcompletion -responseFile orainstall.rsp"

Appending lines to /etc/inittab didn’t work either. The -ignoreSysPrereqs flag for ./runInstaller didn’t appear to do anything. So what to do? Reduce the severity of the error, of course! . I would’ve liked to have figured out how the installer really determines that the runlevel is wrong, since it clearly isn’t using the runlevel command, but after many, many, many attempts, I just wanted to have it install already!!!!
So it turns out, that the severity of the prereq checks are defined in this file, and running this makes the runlevel check not fail the install

sed -i -e 's///g' /database/stage/cvu/cvu_prereq.xml

After all this, you get this in the installActions.log


INFO: *********************************************
INFO: Run Level: This is a prerequisite condition to test whether the system is running with proper run level.
INFO: Severity:IGNORABLE
INFO: OverallStatus:OPERATION_FAILED
INFO: -----------------End of failed Tasks List----------------
WARNING: [WARNING] [INS-13014] Target environment do not meet some optional requirements.
CAUSE: Some of the optional prerequisites are not met. See logs for details. /tmp/OraInstall2014-10-16_12-12-55PM/installActions2014-10-16_12-12-55PM.log
ACTION: Identify the list of failed prerequisite checks from the log: /tmp/OraInstall2014-10-16_12-12-55PM/installActions2014-10-16_12-12-55PM.log. Then either from the log file or from installation manual find the appropriate configuration to meet the prerequisites and fix it manually.
INFO: Advice is CONTINUE

Advice is continue!!! So the install finally keeps going. I haven’t actually put anything in the database I’ve made yet, so there might be a follow up post!

Just one postscript to this. The biggest problem in debugging this is that the Oracle installer was always very keen to delete the log files from the install. So it would fail and I would have no idea what was wrong.

Backgrounding this little shell script before running runInstaller, would tail the contents to /opt where I could actually read them, before the installer deleted them.

#!/bin/bash

FOLDER=false
while [[ $FOLDER == "false" ]] ; do
echo "not found"
sleep 3
find /tmp -name "Ora*" | grep -q Ora
if [[ $? == "0" ]] ; then
FOLDER=true
else
FOLDER=false
fi
done

cd /tmp/Ora*
sleep 5
tail -f /tmp/Ora*/installActions* > /opt/installActions.log &
tail -f /tmp/Ora*/oraInstall*.err > /opt/oraInstall.err &
tail -f /tmp/Ora*/oraInstall*.out > /opt/oraInstall.out

Posted in howto, script | Tagged , , | 2 Comments

How to script logging into WebSphere Portal 8.0

I’ve been testing WCM prerendering a bit, and being able to build initiating the prerendering process into a fully fledged test runner is invaluable. To do it manually, you’d log into Portal and then hit a special URL to start the process.

It can be a bit tricky scripting a login to Portal from the command line as the URL is generated dynamically (on a per server basis). We can easily capture the unique parts of the request

This technique can be used for all sort of other automation obviously, not just prerendering (for instance warming up the Portal caches by hitting all of the pages).

1. Fire up Chrome, press ctrl + shift + J to kick it into developer mode.

2. Navigate to the login portlet. You only want to capture one request with Chrome, so make sure you only need to click the login button

Portal Login Portlet

3. Go to the Network tab in developer mode and clear out any old captured requests.

4. Fill in the username and password and click the login button.

5. You’re now logged in. Hooray. Find the POST request in the list of captured requests :

post-request

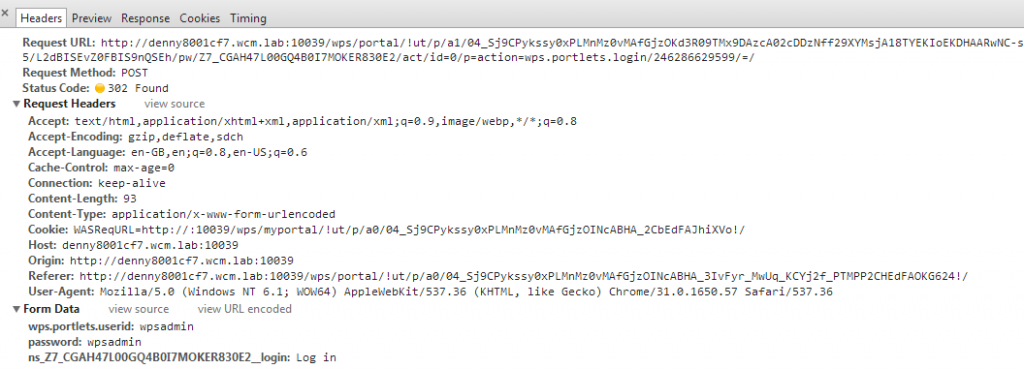
6. Click on the link in the post request to bring up the headers tab :

Post request headers

7. Make a note of the Request URL and the parameters (wps.portlets.userid, password , + ns(dynamic stuff)_login) in the form data.

8. Then insert the parameters you’ve just found out into either this wget or curl command, depending on which one you like better. I’ve externalized them a bit to try to make it a bit clearer, just replace them with the values you got in step 7. I’m using localhost because I’m kicking off the process on the Portal Server itself.

PORTAL_USERNAME='wpsadmin'
PORTAL_PASSWORD='wpsadmin'
LOGIN_BUTTON_ID='ns_Z7_CGAH47L00GQ4B0I7MOKER830E2__login'
REQUEST_URL='http://localhost:10039/wps/portal/!ut/p/a1/04_Sj9CPykssy0xPLMnMz0vMAfGjzOKd3R09TMx9DAzcA02cDDzNff29XYMsjA18TYEKIoEKDHAARwNC-sP1o_Aq8TSDKsBjRUFuhEGmo6IiAHdPO8A!/dl5/d5/L2dBISEvZ0FBIS9nQSEh/pw/Z7_CGAH47L00GQ4B0I7MOKER830E2/act/id=0/p=action=wps.portlets.login/246286629599/=/'

wget :

wget --save-cookies cookies.txt -keep-session-cookies --post-data "wps.portlets.userid=${PORTAL_USERNAME}&password=${PORTAL_PASSWORD}&${LOGIN_BUTTON_ID}=Log+in" ${REQUEST_URL} -O login.html

curl:

curl --cookie-jar cookies.txt -d "wps.portlets.userid=${PORTAL_USERNAME}&password=${PORTAL_PASSWORD}&${LOGIN_BUTTON_ID}=Log+in" ${REQUEST_URL} > login.html

9. Check cookies.txt to make sure there is something in there (a saved cookie). If it’s empty, open login.html in a browser to see what went wrong.

10. Once that is working you can hit the url that you want to use, while referencing the saved cookie file. I’ll use the prerendering url I talked about in the introduction.


wget:

wget --load-cookies cookies.txt "http://localhost:10039/wps/wcm/myconnect?MOD=Cacher&SRV=cacheSite&Site=site&library=library"

wget
curl:
curl --cookie cookies.txt "http://localhost:10039/wps/wcm/myconnect?MOD=Cacher&SRV=cacheSite&Site=site&library=library"

Final notes:
This should work for most releases of Portal – I’ve done it on 7.0 and it’s worked fine.

Posted in howto, script | Tagged , | 3 Comments

Jenkins Java OutOfMemory?

I was seeing this OutOfMemory error on our Jenkins instance. It’s a good thing really. It means our backend infrastructure is making more nodes that ever before and we are hitting limits in the default config of Jenkins. This error was in the logs. We’re using the IBM JVM (natch).


Sep 5, 2013 3:38:57 AM hudson.remoting.Channel$2 handle
SEVERE: Failed to execute command UserRequest:hudson.remoting.PingThread$Ping@6e6f6e6f (channel ci-p-94545)
Throwable occurred: java.lang.OutOfMemoryError: Failed to create a thread: retVal -1073741830, errno 11
at java.lang.Thread.startImpl(Native Method)
at java.lang.Thread.start(Thread.java:891)
at java.util.concurrent.ThreadPoolExecutor.addThread(ThreadPoolExecutor.java:694)
at java.util.concurrent.ThreadPoolExecutor.addIfUnderMaximumPoolSize(ThreadPoolExecutor.java:740)
at java.util.concurrent.ThreadPoolExecutor.execute(ThreadPoolExecutor.java:668)
at java.util.concurrent.AbstractExecutorService.submit(AbstractExecutorService.java:103)
at hudson.remoting.DelegatingExecutorService.submit(DelegatingExecutorService.java:42)
at hudson.remoting.InterceptingExecutorService.submit(InterceptingExecutorService.java:46)
at hudson.remoting.InterceptingExecutorService.submit(InterceptingExecutorService.java:41)
at hudson.remoting.Request.execute(Request.java:307)
at hudson.remoting.Channel$2.handle(Channel.java:461)
at hudson.remoting.SynchronousCommandTransport$ReaderThread.run(SynchronousCommandTransport.java:60)
Sep 5, 2013 3:38:57 AM hudson.remoting.Channel$2 handle
SEVERE: This command is created here

Googling this error leads to a bit of a red herring. Usually when you see an OutOfMemory error and it references threads, this is commonly a native (system) out of memory because each additional thread that the JVM spawns uses native memory (as opposed to Java Heap memory). The counter intuitive advice in this case is to lower the Java heap size – since a large Java heap is crowding out the address space that needs to be used for keeping track of new threads. Check out this article on Developerworks for an excellent rundown on a traditional native out of memory and how to fix it.

In this case the operating system had plenty of free memory and Jenkins hadn’t been changed from it’s default heapsize (512m on my system) so crowding out of native memory wasn’t the issue. So how many threads were being used anyway? This will give you the answer on Linux :


ps -eLf | grep jenkins | grep -v grep | wc -l

For me it returned 1024, which seemed like a bit too much of a nice round number. Perhaps it could be a limit of some sort? 🙂 Enter ulimit.

Ulimit!

Ulimit!

Ulimit has never done me any favours. It’s purpose is to stop one user from hogging the resources of a system. It seems to harken back to a different age where there were lots of different users (at a university say) logging into one large system. In my experience it just stops things from running the way you think they will. All I ever seem to do with it is increase limits. YMMV, rant over.

So usually with ulimit, you’d edit the /etc/security/limits.conf file to raise the hard limit of the resource type:

jenkins hard nproc 62835

and then add a line in the user’s login script (.bash_profile) to set the new limit.

ulimit -u 62835

The default jenkins configuration on RHEL 6 has an application user called jenkins that has login disabled – so there is no way to trigger setting the ulimit. What’s the cleanest way to fix this? It seemed a bit crappy to have to enable a login account for this user. Still, I wasn’t sure how to do it, so I modified the jenkins user to have a login shell and created a one line .bash_profile script to set the ulimit. This still didn’t fix the problem (so we didn’t hit the login shell at all), so I delved into the /etc/init.d/functions script which actually starts the jenkins/java process. It ultimately uses the ‘runuser’ command to start jenkins.

I pulled out the same command to start Jenkins as the jenkins init.d script uses and tested all sorts of ways of setting the ulimit.

This will return the default (1024) – so we’re not hitting the bash_profile script.

runuser -s /bin/bash jenkins -c 'ulimit -u'

But this will return the correct value (62835).

runuser -s /bin/bash --login jenkins -c 'ulimit -u'

So then it looked like the answer was editing the /etc/init.d/functions script.

Uggh.

It’s used by all sorts of different services (all of them?) on a Redhat system. Must be an easier way. Well, I never knew this, but the soft ulimit will actually change the user’s ulimit values without you having to make a change in a login script.

A simple addition to the ulimit.conf file , and we’re good.


jenkins hard nproc 62835
jenkins soft nproc 62835

To verify, running this now returns 62835. (Don’t ask how I picked that number).

runuser -s /bin/bash jenkins -c 'ulimit -u'

A postscript, I found that I couldn’t make a thread dump happen with jenkins, because stdout is pointing at /dev/null. If you’re dealing with a different java application , a thread dump is a good first point of call because it prints a list of the ulimit settings that are in effect for the process, making the first stage of debugging that much easier. To get a thread dump from a jenkins process, start it without the –daemon value and then do a kill -3 from a different terminal window.

I know that was a bit long, but thought going through the procedure of figuring out the answer might be interesting.

Posted in solution | Tagged , , , , , | 2 Comments

Getting IBM Bootable Media Creator to run on Ubuntu 12.04

Little update to my previous article on getting BoMC to run on Ubuntu. The Bootable Media Creator allows you to make an iso file with the latest IBM firmware on it, so you can keep everything up to date. You can get the BoMC here.

After trying again with a new install of Ubuntu, I noticed it didn’t quite work the same way. Before all I needed to do is create a /etc/redhat-release file and just run the thing.

With this version, doing the same thing resulted in this error:

/ibm_utl.bin
Extracting...
Executing...

./linmain.sh: 2: ./linmain.sh: source: not found
cp: cannot stat `SYSTEM_SUPPORT_LIST_.xml': No such file or directory
locale: unknown name "="

It still runs but the list of systems in the UI comes out blank, and so it is unusable.

To get this to work:
1. Unzip ibm_utl_bomc_9.40_rhel6_i386.bin to a temp directory.
2. Go sudo su to become root (sudo by itself doesn’t cut it).
3. BoMC uses a different ssl library, so install it by issuing

sudo apt-get install libssl0.9.8
sudo ln -s /usr/lib/i386-linux-gnu/libssl.so.0.9.8 /usr/lib/i386-linux-gnu/libssl.so.10

I found that if I didn’t do this step, the application would appear to work, but would hang while trying to download anything.
4. Finally, run ./linmain.sh to start BoMC.

Posted in howto | 6 Comments

Active Directory over SSL – banishing 8009030e to the land of wind and ghosts

This is one of those solutions where you’re not 100% sure why it works but it just does. If you’re tearing your hair out trying to get LDAP to run over SSL, and seeing ‘8009030e’ , give this a go.

I have a under appreciated AD 2008 server which we use to test with IBM Web Content Manager. Recently I had to get it integrated with WebSphere Portal over SSL. I was sure when I set it up all those years ago that SSL worked, but today all I saw was a reset connection and the following error message in the Event logs:


LDAP over Secure Sockets Layer (SSL) will be unavailable at this time because the server was unable to obtain a certificate.

Additional Data
Error value:
8009030e No credentials are available in the security package

After one of those Googling sessions where you end up with 30 browser tabs and you get no closer whatever you try (making a new self signed cert, trying openssl instead, resetting permissions on random registry keys and folders) I thought – why not see if the certificate works with IIS?

IIS wasn’t set up to use SSL, so following the instructions here (start from “IIS manager”) I set up a binding to the SSL port and noticed that my new self signed certificate wasn’t in the list of possible certificates in the ‘Add Site Binding’ window. Looking up a few steps – it seems like there’s a nice button labeled ‘Create a self signed certificate’. Once I bound that to IIS, SSL worked fine from a browser. And wouldn’t you know it, then the LDAP over SSL started to work! I didn’t even need to restart AD. Worth a try right?

Posted in random, solution | 7 Comments

How to print hosts in a vSphere cluster using vcli

Posting this because it was way simpler than I thought, and I don’t need to write any perl!
You can just run one of the commands that is included with the vSphere Command-Line Interface (vCLI) and grep out the hosts to your heart’s content.
The command is :


/usr/bin/vicfg-hostops --config [config file] -c [cluster name] -d [datacenter name - optional] -o info

Gotta love a quick win on a Monday morning.

Posted in howto | Tagged , , | Leave a comment

Using Linux command line tools to parse vSphere Export List output

I live on the command line most of the time. Often times I will want to grab a list of machines from vSphere and do something with them. In this instance, I wanted to write a script to delete old orphaned VM files of machines that existed on a NFS array, but weren’t present in vSphere. In the vSphere client, it is simple enough to bring up a list of these machines in the UI (navigate to datastores view, select datastore, navigate to Virtual Machines tab). Then one uses the File -> Export -> Export List command to convert this list to a file. There are a number of formats that it is possible to export to, but CSV is by far the simplest (I tried all of them!). After copying the output to a linux machine, I tried running grep against using an obvious match and got nothing:


# head -n 1 /opt/machines.csv
ÿþNAME,STATE,STATUS,HOST,PROVISIONED SPACE,USED SPACE,HOST CPU - MHZ,HOST MEM - MB,GUEST MEM - %,SHARES VALUE,LIMIT - IOPS,DATASTORE % SHARES,NOTES,ALARM ACTIONS,PNC.CUSTSPEC,PNC.DEPLOYED,PNC.GROUPID,PNC.SOURCE
# grep STATE /opt/machines.csv
#

It was only after trying lots and lots of different stuff, that we realised the file is UTF16 encoded, and the standard GNU tools can’t deal with it:

# file /opt/machines.csv
/opt/machines.csv: Little-endian UTF-16 Unicode text, with CRLF, CR, LF line terminators

Using iconv to convert it to ascii means it is possible to use grep/sed etc now:

# iconv -f utf-16 -t ascii /opt/machines.csv > /opt/fixed-machines.csv

# grep STATE /opt/fixed-machines.csv
NAME,STATE,STATUS,HOST,PROVISIONED SPACE,USED SPACE,HOST CPU - MHZ,HOST MEM - MB,GUEST MEM - %,SHARES VALUE,LIMIT - IOPS,DATASTORE % SHARES,NOTES,ALARM ACTIONS,PNC.CUSTSPEC,PNC.DEPLOYED,PNC.GROUPID,PNC.SOURCE

Tiny little fix, but it had been annoying me for months. Big thanks go to Matt Ponsford for debugging this with me.

Posted in Uncategorized | Leave a comment

ESXi – unable to complete sysinfo operation when unmounting NFS datastore

I am currently trying to prepare a old NetApp filer (FAS960C) for a cold hard life in the scrap yard.

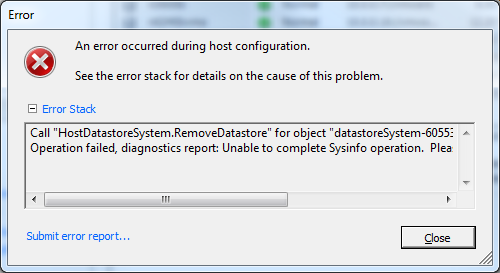
I thought it would be as simple as storage vmotioning all the VMs off it, and then simply unmounting the datastore from vSphere. Unfortunately I get this message when trying to unmount the darn thing.

what the heck does this mean?

what the heck does this mean?

So the error message says see the VMKernel log. I enable ssh on the host and check out /var/log/messages. [na] is the name of my datastore.

GFeb 12 06:34:33 vmkernel: 0:00:57:57.020 cpu11:5646)WARNING: NFS: 1675: na has open files, cannot be unmounted

So which files does it have open?!? I have removed all the VMs. This was the tricky part – on a normal Linux box, you would run lsof and in two seconds you would know which process using the files. In ESXi, you go:


esxcli network connection list | grep datastore ip/hostname

This returns the following :


/vmfs/volumes/c87b8682-017488df # esxcli network connection list | grep 10.0.0.10
tcp 0 0 10.0.0.45:1014 10.0.0.10:2049 ESTABLISHED 5163
tcp 0 0 10.0.0.45:1013 10.0.0.10:2049 ESTABLISHED 5163

The first IP column is the host, the second is the datastore. The last column is the world ID , which is like a PID. So plugging this into ps gives me:

/vmfs/volumes/c87b8682-017488df # ps aux | grep 5163
5163 5163 busybox syslogd

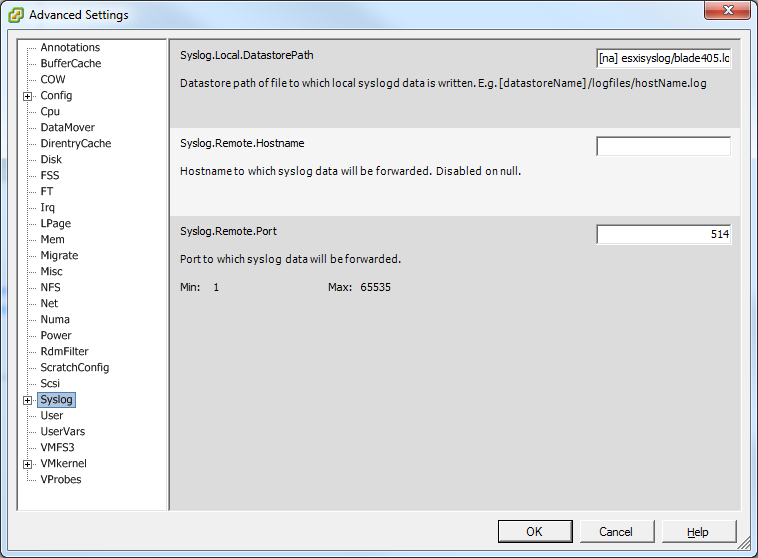
Well there you go – it looks like we have set this up this machine to use the Netapp as a place to store logs. Completely forgot I ever did that! A quick check of the software -> advanced settings dialog reveals this is the case:

vsphere syslog settings

Clearing that dialog and a quick reboot will fix that.

Posted in solution | Tagged , , | 1 Comment

100% CPU on Netapp / N Series

I’m pretty partial to the ol’ N Series (IBM’s version of Netapp storage). We use them as our VMware storage over NFS. Easy to set up and manage.

This problem has been annoying me for ages, and I’m excited to finally have an answer to it. Every now and again, users would complain that performance had dropped through the floor. I’ve got pretty used assuming that bad VM performance = bad storage performance , and so jump onto the N Series / filer straight away.


systat -x 1

is a good start when investigating – it’ll show you how many NFS packets are passing through the filer, and the CPU, Network and Disk utilization levels needed to service the requests . The Disk Util column is interesting too – it isn’t an average or anything, it’s the busiest disk in the filer. And since we’ve got 50-ish disks in the filer.

This is what a normal sysstat output looks like. (At least for me).


netapp> sysstat -x 1
CPU NFS CIFS HTTP Total Net kB/s Disk kB/s Tape kB/s Cache Cache CP CP Disk FCP iSCSI FCP kB/s iSCSI kB/s
in out read write read write age hit time ty util in out in out
64% 3039 0 0 3039 20249 4826 25087 52299 0 0 12s 93% 100% :f 24% 0 0 0 0 0 0
55% 2816 0 0 2816 17085 12570 20919 37107 0 0 12s 85% 100% :f 17% 0 0 0 0 0 0
44% 2856 0 0 2856 17580 6341 12312 39792 0 0 12s 82% 100% :f 51% 0 0 0 0 0 0
28% 3448 0 0 3448 18033 6292 4988 3980 0 0 12s 82% 13% : 12% 0 0 0 0 0 0

And this is one when all hell is breaking loose:


CPU NFS CIFS HTTP Total Net kB/s Disk kB/s Tape kB/s Cache Cache CP CP Disk FCP iSCSI FCP kB/s iSCSI kB/s
in out read write read write age hit time ty util in out in out
100% 26 0 0 26 148 9 4584 7308 0 0 7s 100% 50% : 39% 0 0 0 0 0 0
100% 66 0 0 66 260 20 4728 0 0 0 7s 100% 0% - 31% 0 0 0 0 0 0
100% 39 0 0 39 275 211 5071 24 0 0 8s 100% 0% - 29% 0 0 0 0 0 0
100% 143 0 0 143 633 43 4548 8 0 0 8s 100% 0% - 30% 0 0 0 0 0 0

See the NFS column? It’s not like the CPU is busy because it is servicing NFS requests. It’s not being overtaxed by the VMs – it’s something internal to the filer. Even the Disk Util isn’t very high. What’s going on?

In our particular environment, our VMs are really disposable, since the build of WCM that goes into them is obsolete the next day. At any time the filer might be half filled with switched off VMs. Eventually, the filer fills up and you have to delete all the obsolete VMs. This is what has caused the high CPU – deleting a bunch of VMs. Each are about 25 gigs and I must have deleted around 200 or something. The deleting process itself is quite quick, but it spiked the CPU for about an hour. An agonizing hour!

At the very least, it’s great to know what was going on. I’ll open a case with IBM support and report back (if I can). In the meantime better write a delete queue to try not to tax it as badly.

Posted in tip | Tagged | 6 Comments